Thursday, May 17, 2012

{Our Family Room}

We're renters, of course I already mentioned that before. We rent a basement in the Salt Lake City, Utah area. At about 800sqf you can only imagine how creative we must be when arranging furniture, and staging our house in a manner that is functional for us, yet stylish. Although we rent, it does not stop us from innovating our space every day, we like to feel at home wherever we live. We also like to feel comfortable, and for our spaces to reflect our personalities. After all, it's where Life Happens.

 As I mentioned before, we may not be able to renovate, but it doesn't stop us from innovating. I want to show you our delicious family room, and although it is still a work in progress, right now this is what our small but cozy family space looks like.


There is a small empty space where the fire place should be, the landlords decided it was unnecessary, so they left it empty. For us, well it wasn't easy to work with, and for baby, not very friendly. So we decided to block it and hide it away by placing out little entertainment center in front of it. It's kind of cool because it hides most cables out of sight, except for the one coming from the mantel, kind of ugly I know, but in this case, 1 is better than all.


 Notice the blank canvas above the mantel? We are still searching for our other half piece of art.


Baskets have to be a running joke in my home, I love baskets! They are so versitile, I use them for everything! Blankets, shoes. movies, toys, you name it.


A tray on a coffee table has got to be both pretty and practical. Trays not only consolidate things in a neat mannor, but also give it purpose, trays are so powerful, they are easy to move aside when in need of space usage, you can almost put nything on them grouped together, and automatically look prettier.


We keep our remotes in this pretty box. Another pretty but practical way of storing away electronics.


Our two wicker chairs add texture and a relaxed feel to the room.

 I absolutely adore our aqua colored chinese stool. It's so shiny!


This coffee table, I already blogged about how much I am in love with! It's made of reclaimed wood, and the price was a steal! check out my High Low Projects


Our humble living space is a work in progress, and we will continue to update. Thank you so much for visiting, we kindly appreciate it.

Tuesday, May 15, 2012

~A Girly Closet~

So for this last weekends organizing project, I helped my sister in law again, and this time we cleaned, decluttered and organized her little girls closet. It was oh so fun, and oh so pink!

This is what it looked like.


 And this is what it looked like After we tackled it!


Isn't it cute?


Yay, thanks again Loni!

Friday, May 11, 2012

DIY: A DeLightful Shade Re-do

Remember how I gave my lamps a tiny makeover back in December?


Well when I did, I was sort of taking desperate measures, after having this lamp for a couple of years and seeing how boring and plain white it was, I gave it a tiny makeover. Well, after much thinking of what else I could do with this shade, I figured it out, of course on a super tight budget.

Here's a quick tutorial how.
The thin ribbon didn't really make a big difference on this boring white shade.


Tape it up!
I chose this pattern based on nixon pattern by jonathan adler. Well, I tried my best.

So this is kind of embarrasing, but getting the exact measurements and pattern on took me about 4 hours to figure out, I had to re-tape it a couple of times. It was crazy! But it worked out.


Choose Spray Paint


Spray Away!

Let Dry

Time for Reveal!  I got all giddy ripping off the tape.

Looking good so far!


Voila!


What do you think?
The paint sort of found its way inside a little, which gave it a smoky look. But I kind of like it.

I haven't shown the way they look in my room yet, but coming soon!

Have you done any cool transformations lately?

Tuesday, May 8, 2012

Beauty Station: from Blah to Glam!

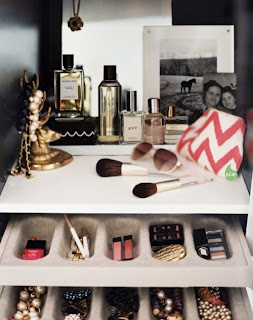
I never used to display my makeup, I used to only carry it in a makeup baggie, I'm not very high maintenance you see, and I've always considered myself a minimalist. Keeping spaces neat, clean, with not very many things popping everywhere. Lately though, I've been feeling giddy and eager to show off my girly and luxurious side off.


These makeup spaces are so glamorous and fun, and oh so organized!


Why not? I've always loved the way girly things make a vanity look, I just always avoided crowdedness, and too much pop. But I just love these products so much, I finally decided to do it.


Still, it didn't look as glam and romantic as I was craving, so I took it to the next level, and I DIY a very delicious Tray.


What do you think? Doesn't it look more glamorous?
I just love the way this Tray makes my beauty space look, it adds so much luxury.

If you would like to learn how to DIY this gorgeous tray, click <here>


DIY: TrayLicious

As you may have already read my latest post about glaming up my makeup space, with this delicious and pretty tray, here is a quick tutorial on how YOU  too can make your own tray.


Supplies Needed:
-Old Cookie Tray (I got mine at goodwill for $2)
-Pretty Self-Adhesive paper (Home Goods, hmm I love Home Goods)
-Spray Paint
-Phelt fabric

First, take your Ugly and Old Cookie tray somewhere there is enough ventilation.


Than Spray Paint it. You don't have to spray paint it everywhere, the most important parts are the 4 sides on the inside, and the very top (lips) of the tray or edges. Those will be the only areas to show the paint.


Next you will need to measure the adhesive paper to fit inside the bottom of the tray.
(I got this adhesive paper at TJ Maxx, and I fell in love the first time I layed eyes on it! Ahh...I had to have it. )

  Than place your paper on the tray, like this. Watch out for bubbles!

Next you will need to measure again, so that the paper fits perfect on the sides, like this.


And last but definitely not least! Glue some felt fabric on the bottom so the tray doesn't scratch any surfaces.

And you are done!


What do you think?


Than use it wisely!

Hmm...my beauty station looks much better!


What amazing transformations have you done?

This project has been linked to Giggles, Glitz & Glam, Vintage Wanna Bee,