Thursday, February 14, 2013

Happy Valentine's Day

Happy Valentine's Day, isn't this such a lovely holiday? Heart balloons everywhere, stuffed bears, heart shaped chocolate boxes, and flowers!! i adore flowers, my favorite thing to get every holiday it requires the hubs to buy me something. Just a simple bouquet of flowers will make my day.

This year i wanted to make something cute, and girly, for my little nieces and little sister.


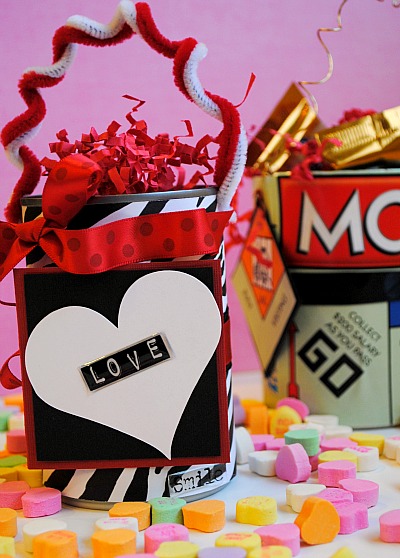
 i saw these super cute mail boxes, and i just had to have them. Perfect for V-day. Just a little something to celebrate, and to give for Valentine's day.


Filled them with yummy chocolate and heart shaped confetti i made, with paint swatches and my heart shaped puncher.


i even personalized them with their own sticker monogram.
And a little heart on the front of each mail box.

In Case you Missed my Amazing Guest post this week, click here to learn how to make these super yummy Valentine Treats.

 
Happy Valentine's Day peeps
xoxo

Tuesday, February 12, 2013

You Made That? Valentine's Day Guest Post

Happy Thursday my friends, even though it's such a cloud day today, it's still a happy one. Today i have a special treat for ya'll. i am super giddy about this guest post, not only is Suzanne one of my good friends, but she is an amazing cook, and blogger. Her website is full of amazing and delicious recipes, when i am in need of making something flabbergasting, i turn to her site to see what amazing thing she has created, so i can copy and paste. i love how detailed all of her explanations are, and so much information on how to get it done perfect!

On behalf of Valentine's Day this week, Suzanne made some yummy Valentine treats to share with us all. They are super easy, and super cute! Check out the links to see what beautiful things she has made and how to make them, Such as these:

So without further due, here is the lovely Suzanne.
Hello, I'm Suzanne from You Made That?  I'm excited to be guest posting here at Claudia's lovely blog.  Claudia has a knack for making things functional but beautiful, a talent not all of us posses.  I like to craft and cook but cooking or I should say baking comes much easier to me than crafting.  I started my blog almost 3 years ago  when I was involved in writing crafty and food posts for another site called The Mother Huddle.  I wanted my own creative outlet that I had control over what I posted and a place I could document my recipes for my children.  I wish I had my Grandma's recipes written down because she was a fabulous cook and baker but she passed away and we are left with trying to find similar recipes that taste like Grandma's, so my goal is that my kids will have all of our families beloved recipes.  I've found that cooking for my family is a great way to get closer to my family.  Cooking, eating and cleaning up together gives us time to talk and in this electronic world we live in we could all use more of that. It's so easy to eat take out or even a quick frozen meal, but with a little planning we can have healthy and delicious meals.

I love Valentine's Day and I usually make homemade Valentine's for my kids and husband along with other small gifts and goodies that I share with them. If you are like I am and like making things homemade then you will love to try out making your own bakery style cookies.  I have been admiring the professional looking cookies decorated with royal icing and using a technique called flooding but I was a a little nervous about it but I finally got inspired enough to just try it out.  What is the worst that could happen, a pile of ugly cookies but still very edible and delicious...doesn't sound like much to loose.Well let's get talking cookies, I want to share with you a great recipe for sugar cookies and frosting that will make you feel like your a professional cookie baker.  I can't take credit for the recipes I use here (although I've made slight changes) because I found a wonderful blog called Bake at 350. Brdiget shares all her secrets on making the prefect cookies and frosting, plus tons of cute cookie ideas. I was inspired by her long ago when I wanted to try out a new sugar cookie recipe, her recipe is simple,delicious and predictable. I also use her frosting recipe because after trying another recipe hers worked best.

Ingredients:
3 cups all purpose flour
2  tsp. baking powder
1 cup sugar
1 cup butter, cut into chunks and still cold
1 egg
1 tsp. vanilla
 1/2 tsp. almond extract

Directions:
Step 1:  Pre-heat oven to 350 F
Step 2:  Cream the butter and sugar together.  Add the egg and extracts and beat well.
Step 3:  Gradually add the flour to the wet mixture.  If you do not have a stand mixer, the mixture will be crumbly and you will need to knead it together by hand.
Step 4:  Roll the dough out  onto  a floured surface to 1/4 inch to 3/8 inch thick, cut out shapes.  Place on parchment paper on cookie sheet and put into the freezer for 5 minutes before baking.  I highly recommend you do not skip this step, it really makes a difference and holds the shape of your cookies.
 Step 5:  Bake for 10-12 minutes.  Cool in the pan for 5 min, then transfer to cooling rack.

Ingredients for icing:
4 Tbsp. meringue powder
 scant 1/2 cup of water
1 lb. of powdered sugar (sifted)
1/2 - 1 tsp. corn syrup
a few drops of flavored clear extract (optional)

Directions:
Step 1:  Put meringue powder and water in a large mixing bowl, I use a stand mixer.  Using a  paddle attachment mix until the mixture is frothy looking
 Step 2:  Add the sifted powdered sugar, the corn syrup and extracts if desired. 
Step 3:  Beat the frosting at medium high for 5 minutes until shiny and stiff peaks form. The stiff frosting is perfect for outlining the cookies with tip #3 and then you will need to thin the frosting with a teaspoon of water at a time until you get a nice flowing consistency ( a bit runny in my opinion).
Decorating Must haves:

I bought a cheap decorator set at the grocery store this past week.  I found it was perfect for flooding or filling in the cookie after you have outlined it.  It was a small accordion looking squeeze bottle, it had 3 or 4 tips with it.  The small round tip worked perfect for filling in the cookie with frosting.
Step 1:  Divide frosting 3/4 of it you will make pink, and 1/4 you will leave white. Royal frosting drys fast so it's necessary to cover the unused portions with plastic wrap so the air does not dry it out.  Cut off the end of the disposable bag, not too much and then put a coupler into the bag.  Put the bag into a large canning jar or drinking glass so it stands up and fill with your pink frosting. Put a piece of wax paper down on your work surface and outline all the cookies with tip #3, it works best if you pull the frosting toward you as you outline. If you try to just outline like you would draw on a paper you will get frustrated with how it looks.

Step 2: Then empty the pink frosting into a bowl and add a teaspoon of water at a time and stir well until you get a thinned frosting. Flood about 6 cookies with the pink frosting you thinned out.  It would be helpful to have 2 small decorating bottles like I found for flooding, you can use the disposable bags for flooding it's just harder to control the frosting.

Step 3:  Thin out the white frosting and make small dots on the top of the cookies you flooded pink. Let dry completely before putting into a air tight container.  I made the mistake of thinking mine were dry and put a textured plastic wrap over the cookies and when I pulled up the plastic wrap a texture was on most of my cookies :(.  Repeat the above steps for the rest of the cookies.  If you try to flood more than 6 cookies at a time the dots will on sink all the way into the pink frosting and you will have raised dots.

I hope you enjoyed learning to make these cookies. Please visit Bridget's blog for tips and questions she has lots of experience, much, much more than me.

Happy Valentine's Day!!
Thank you for stopping by Suzanne, visit Suzanne at You Made That? for more!
xoxo

Monday, February 11, 2013

Valentine Ideas + Website Featurette!

Now on the Woman's Day Website! This is sooo exciting, i know i've been posting the awesome Woman's Day experience like crazy, but i am now being featured on the website. I love it!! Just had to share. Click here to check out the feature.
In case you missed the magazine this month, you can check out how i DIY'd my armoire in detail, Here and Here.


Valentine's Day is on Thursday, and I cannot believe it's already here. i love this holiday, it's so sweet, and colorful. And there are so many cute things you can make to giveaway. Here are a few of my pins, i have been so busy lately, i didn't get a chance to make any of my pins, but i will post on Wednesday my Valentine's for this year.
 
For your Teacher
(i am so doing this when Nolan is in school)


For the Sweet Tooth


For the LOVE of art


For the cook
 

For your Crush


For a special one

 
See you Wednesday
 
xoxo


Wednesday, February 6, 2013

Walk In Closet Frenze

This week, i had the kindest client ever, she hired me because she needed help organizing her closet. Not only was she kind, but she had a beautiful closet. So much storage space. She told me, you know what you're doing, do what you whatever you want, and i'm sure i will like it. haha, i love my clients, they totally trust me, and i completely appreciate it, it means the world to me, knowing that clients trust my taste, my talent, and my knowledge. After a consultation, i gave her some shopping ideas on what tools she could get for her closet, as well, as gave her two things to do before i came over. This is what i always tell my clients that hire me to organize their closets.

1. Go through all of your clothes, and make a donation pile, and..
2. Buy the necessary tools, bins, boxes, hangers, dividers, etc. ( i always provide my clients with ideas, inspiration, and links so they may shop online, or in stores, this is part of my consultation)

Sure enough, she was prepared, and so helpful. Here are some before pictures.


Amazing storage space, i was so jealous of her wonderful walk in closet!
 
 
So after much work and music, here is the end results.
All of her casuals go on side of the closet, sports wear, casual shirts, cute vests and workout sweaters. Boots, tennis shoes, flip flops, you name it.


The others side of the closet, was the dressier, and more sophisticated area of the space. All of her going out shoes, night gowns, suits, and more formal apparell belong in the display area. Loved her collection of heels.


She has more than 50 pairs of shoes, so we decided the best way to store all of those shoes, would be to divide them each in their own seperate dividers, to protect them, and keep them divided, so whenever she feels like wearing Navy Blue Heels, all she has to do is look at the label.


I love shoe organizers, because you don't have to use them for shoes, for example, this was great to display all of her cluthes, and her beautiful knitted scarves.

 
All of the pants go on the bottom racks, why? Because you need to organize your closet the way you dress, work your way down. Put your blouse on, than your pants, than your shoes. It's as easy as that.


Now you can see her grand collection of hand bags. It gives it such a boutique look, and it keeps them all looking neat, organized, and in great shape.


She said, you saved my life! Thank you so much. I even found things I had no idea I had!
She is so sweet!

Lets do a quick recap shall we?

Before

After

Before

After


Before

After

Before

After


i love it!
Thanks for stopping by.

xoxo


Monday, February 4, 2013

Sneak Peak at Work from Home Space Project

It's Monday and my Weekend is just beggining, super busy though.
My current work desk, at home, since i work from home now, was looking a bit boring, and so not me! i felt it needed some delicious updating. Here's a quick sneak peak on my most current project, you won't guess what i used to make this an incredible and super easy peasy projecto!


See you soon!

xoxo


Thursday, January 31, 2013

DIY: Paint Swatches for Valentines Day Gifts

Oh what a beautiful Friday it is today! Who is ready for the weekend? i used to always look forward to the weekends, because it all started on Friday's for me. Since i started working from home, it feels like my weekends start on Monday's. Seeing that i work on the weekends from home, it has turned my world upside down. But i love it, i love my job.

So can you believe Valentine's day is just in a couple of weeks? Boy, time is flying this year. Since Valentine's day is just around the corner, today i wanted to show you a little project i worked on over (my weekend) it's super simple, and cute. All i used was, paint swatches, i have tons, a heart shape puncher, which you can get in any craft store, i used my coupon so i got it for 50% off! yay!! And a simple frame, got mine at IKEA.


My little Handsome Man loves this puncher


Ta Da!


What do you think? It's quick, it's simple, and so cute. I made one for each of my sister's. I love V-day. The decorations and colors are sooo girly, and sooo sweet! 
 
I love using paint swatches, as you can tell, i have used them for various things, hehe.
 
Thanks for stopping by, and have a terrific weekend!
 
xoxo